Introduction
Dux is an automation engine turned into a Rust library. By automation, we mean orchestration / configuration management (call it an Ansible-like tool), basically something that ensures a given host meets a certain state.
Objective
The goal of the Dux project is to let developers easily "build their own Ansible" and integrate it in a already existing codebase.
Just like you would import the tonic crate in your code and start using it to make gRPC calls to support your business logic, you can import Dux in your Rust project and adapt its usage to your situation.
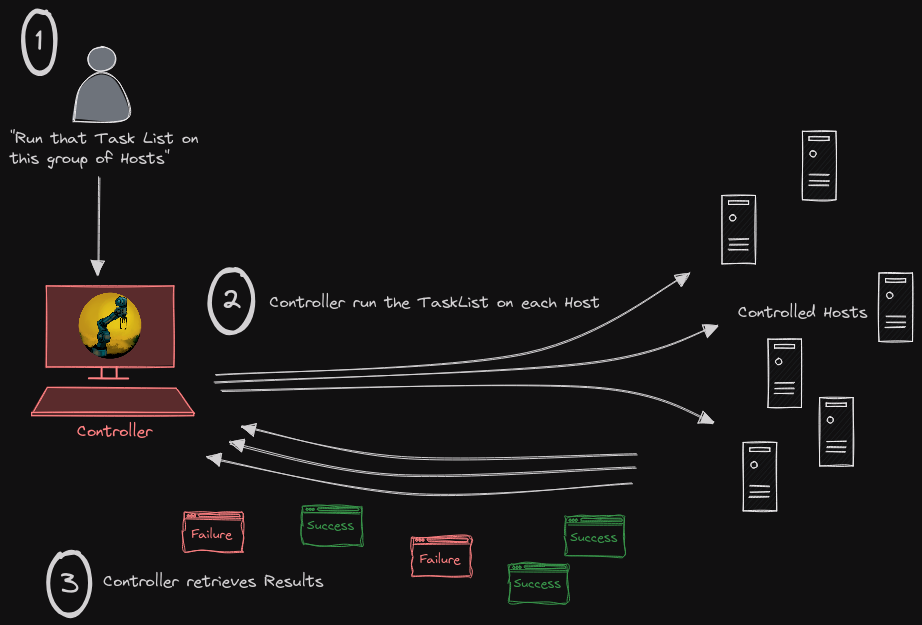
You want the legacy way (one binary running on a master node and having remote root access to everything through SSH) ? You can build that.
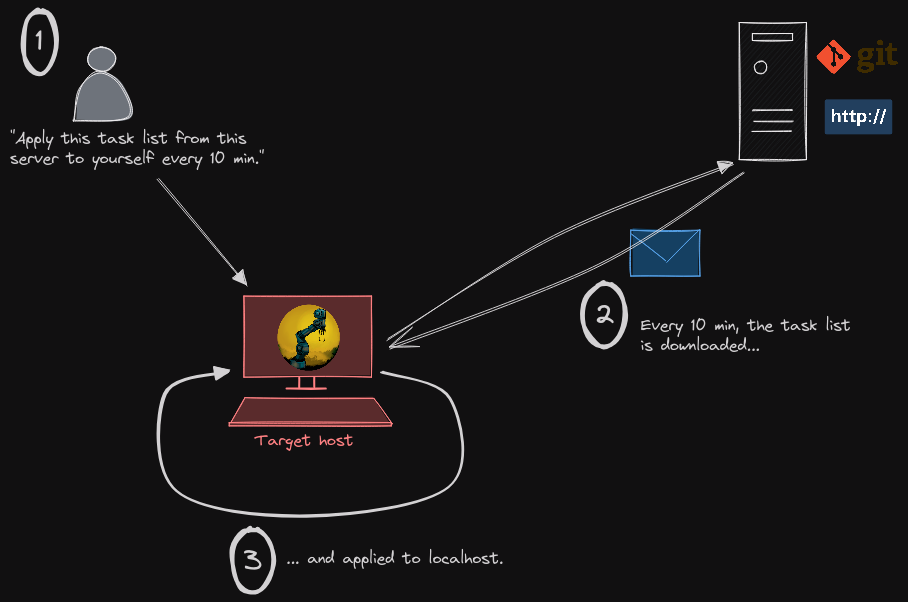
You prefer not to open ports and SSH servers everywhere and let hosts regularly fetch a configuration from some git repo somewhere and apply it to themselves ? You can also built that.
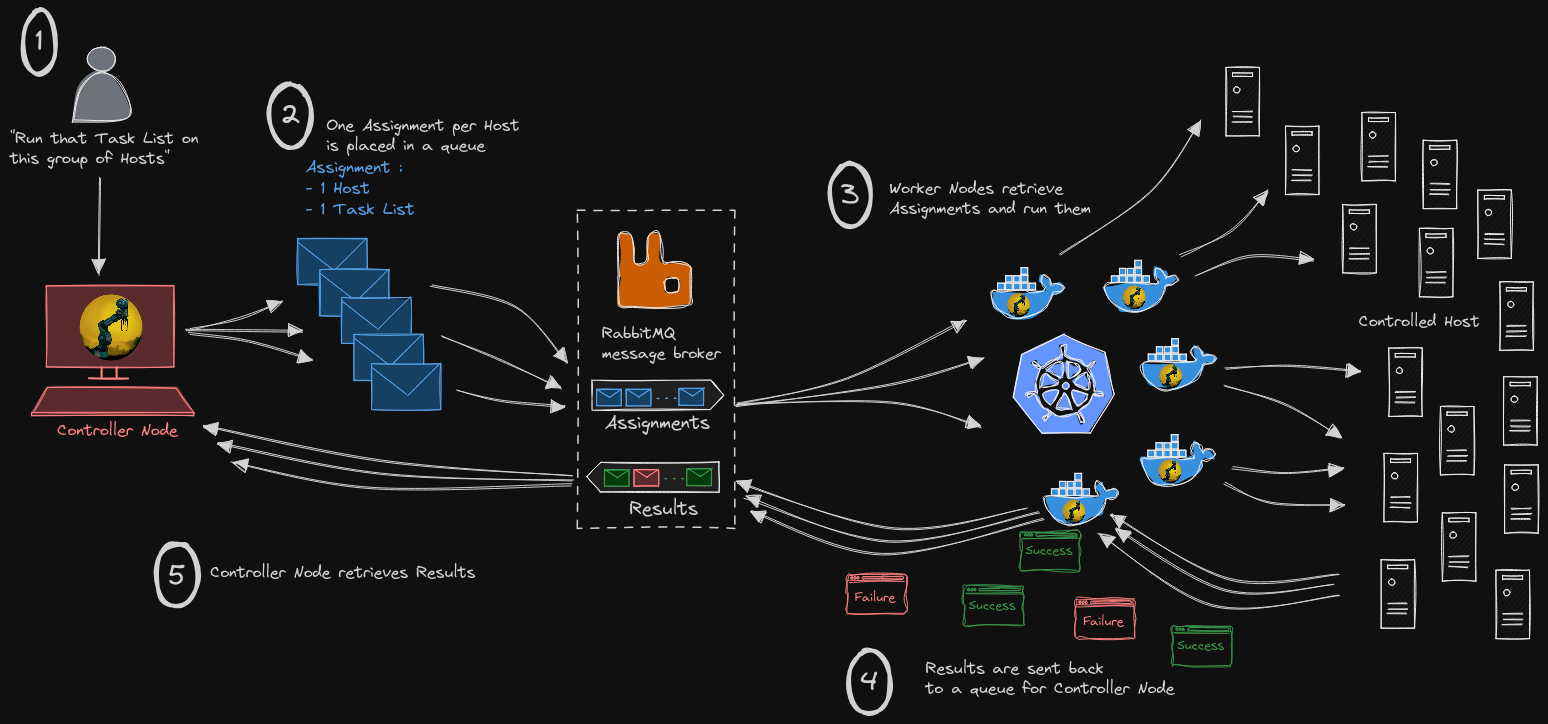
You need to handle large numbers of hosts and want to scale ? You can split the work between controllers and workers, put a message broker in the middle and have many workers behind it handling your hosts. And if you already have a message broker deployed somewhere, just use this one instead of deploying a new one. You are more of a gRPC fan ? No problem. Serialize the work and move it as a Protobuf String !
This book
This book consists of 2 main parts :
- the engine : the dux crate (usage, types, ...)
- examples of how to use it in different scenarios
The Dux crate
Principle
Based on Rust's type system, the workflow is as follows :
- Get a task list : what is the expected state of the managed hosts ? This step produces a
TaskListstruct. - Get a hosts list : which hosts are under the scope of this task list ? This step produces a
HostListstruct. - Generate
Jobs: aJobrepresents a host and allows to track what happens to this host. It contains everything needed to handle the host and apply the expected state. - Dry run or directly Apply the tasklist on the host by leveraging the
Job
Usage
Import the crate
cargo add duxcore
Now let's perform the usual example : setup a webserver (but, this time, right from your Rust code !)
use duxcore::prelude::*;

fn main() {

    // First we need to define what the expected state of the target host is.
    let my_tasklist = r#"---
- name: Let's install a web server !
  steps:
    - name: First, we test the connectivity and authentication with the host.
      ping:

    - name: Then we can install the package...
      with_sudo: true
      apt:
        package: '{{ package_name }}'
        state: present

    - name: ... and start & enable the service.
      with_sudo: true
      service:
        name: '{{ service_name }}'
        state: started
        enabled: true

    - name: What date is it on this host by the way ?
      register: host_date
      command:
        content: date +%Y-%m-%d" "%Hh%M

    - name: Let's see...
      debug:
        msg: 'date: {{ host_date.output }}'

        "#;

    // Then we create a 'Job'.
    let mut my_job = Job::new();

    // We set who the target host of this Job is, and how to connect to it.
    my_job
        .set_address("10.20.0.203")
        .set_connection(HostConnectionInfo::ssh2_with_key_file("dux", "./controller_key")).unwrap();

    // We give it some context and the task list.
    my_job
        .add_var("package_name", "apache2")
        .add_var("service_name", "apache2")
        .set_tasklist_from_str(my_tasklist, TaskListFileType::Yaml).unwrap()
    ;
    // We can finally apply the task list to this host.
    my_job.apply();

    // Let's see the result.
    println!("{}", my_job.display_pretty());
}
This is the basic workflow of Dux. It is up to you to parallelize, distribute the work, display the results in some web interface or send them in a RabbitMQ queue... Whatever suits you best ! The whole point is to let you adapt this automation engine to the context of your already-existing infrastructure. Adapt the tool to the job !
TaskList
Examples
Features
Register
Produce a variable out of the result of a step and use it after.
---
- name: Retrieve the current working directory
  steps:
    - name: Print working directory
      register: working_directory
      command:
        content: pwd

    - name: Display this information
      debug:
        msg: {{ working_directory.output }}
Variables
Dux uses Tera as its template engine.
Modules
Modules available so far
(alphabetized)
| Module | Description |
|---|---|
apt | Manage packages on Debian-like distributions |
debug | Display useful information for debugging purposes |
command | Run a single shell command on the controlled host |
dnf | Manage packages on Fedora-like distributions (no difference with yum) |
lineinfile | Manipulate lines in a file (add, delete) |
ping | Test SSH connectivity with remote host |
service | Manage services on the controlled host |
yum | Manage packages on Fedora-like distributions (no difference with dnf) |
Apt
Handle packages on Debian-based distributions (Debian, Ubuntu, Linux Mint, Kali, Raspberry Pi OS...)
Parameters
| Parameter | Type | Value | Description |
|---|---|---|---|
package | String | <package-name> | Name of the package to handle |
state | String | present|absent | Expected state of the package |
upgrade | Bool | true|false | Do we upgrade the system or not |
Examples
---
- name: Handle packages on Debian-based distributions
  steps:
    - name: Upgrade the whole system
      with_sudo: true
      apt:
        upgrade: true

    - name: Install some package (git)
      with_sudo: true
      apt:
        package: git
        state: present

    - name: Remove some package
      with_sudo: true
      apt:
        package: git
        state: absent
Command
Display useful information for debugging purposes.
Parameters
| Parameter | Type | Value | Description |
|---|---|---|---|
msg | String | <any message> | Message to be displayed (including variables) |
Examples
---
- name: Retrieve the current working directory
  steps:
    - name: Print working directory
      register: working_directory
      command:
        content: pwd

    - name: Display this information
      debug:
        msg: {{ working_directory.output }}
Command
Run a single shell command on the controlled host.
Parameters
| Parameter | Type | Value | Description |
|---|---|---|---|
content | String | <shell command to run> | Content of the shell command to run |
Examples
---
- name: Run some commands on the host
  steps:
    - name: List files in some directory
      command:
        content: ls -lh /tmp

    - name: Run the command with privileges
      with_sudo: true
      command:
        content: ls -lh /root
LineInFile
Manipulate lines in a file (add, delete). The file needs to exist before calling this module.
Parameters
| Parameter | Type | Value | Description |
|---|---|---|---|
filepath | String | <path-to-file> | Path of the file which will be edited |
line | String | <Content-of-line> | Content of the line to consider |
state | String | present|absent | Is the line expected to be found or not |
position | String | top|bottom|anywhere|<line-number> | Where is the line expected (or not) to be found |
Examples
---
- name: Edit some files
  steps:
    - name: Add a line at the top
      lineinfile:
        filepath: /path/to/my/file
        line: the first line
        state: present
        position: top

    - name: Add a line at the 2nd place
      lineinfile:
        filepath: /path/to/my/file
        line: 2nd line
        state: present
        position: 2

    - name: Add a line at the bottom
      lineinfile:
        filepath: /path/to/my/file
        line: the last line
        state: present
        position: bottom

    - name: Remove all occurences of a line based on its content
      lineinfile:
        filepath: /path/to/my/file
        line: the content expected not to be present at all
        state: absent
Ping
Test connectivity with the target host (localhost, SSH...etc)
Parameters
No parameter for this module
Examples
---
- name: Test connectivity
  steps:
    - name: Test connectivity
      ping:
Service
Handle packages on Debian-based distributions (Debian, Ubuntu, Linux Mint, Kali, Raspberry Pi OS...)
Parameters
| Parameter | Type | Value | Description |
|---|---|---|---|
name | String | <service-name> | Name of the service to handle |
state | String | started|stopped | Expected state of the service |
enabled | Bool | true|false | Is the service expected to be enabled ? |
Examples
---
- name: Handle services on the host
  steps:
    - name: Start a service
      with_sudo: true
      service:
        name: apache2
        state: started

    - name: Stop a service
      with_sudo: true
      service:
        name: apache2
        state: started

    - name: Start and enable a service
      with_sudo: true
      service:
        name: apache2
        state: started
        enabled: true

    - name: Disable a service (without stopping it)
      with_sudo: true
      service:
        name: apache2
        enabled: false
Yum / Dnf
Handle packages on Fedora-based distributions (Fedora, CentOS, RHEL, Amazon Linux...)
Parameters
| Parameter | Type | Value | Description |
|---|---|---|---|
package | String | <package-name> | Name of the package to handle |
state | String | present|absent | Expected state of the package |
upgrade | Bool | true|false | Do we upgrade the system or not |
Examples
With Yum
---
- name: Handle packages on Fedora-based distributions
  steps:
    - name: Upgrade the whole system
      with_sudo: true
      yum:
        upgrade: true

    - name: Install some package (git)
      with_sudo: true
      yum:
        package: git
        state: present

    - name: Remove some package
      with_sudo: true
      yum:
        package: git
        state: absent
With Dnf
---
- name: Handle packages on Fedora-based distributions
  steps:
    - name: Upgrade the whole system
      with_sudo: true
      dnf:
        upgrade: true

    - name: Install some package (git)
      with_sudo: true
      dnf:
        package: git
        state: present

    - name: Remove some package
      with_sudo: true
      dnf:
        package: git
        state: absent
Prepare a host to be controlled
On controlled host
As for other automation tools, Dux needs an account to use on the controlled host. Let's create a dux user on the controlled host and give it some privileges :
# Create user (set password interactively)
sudo adduser dux

# Add user to sudo group
sudo usermod -aG sudo dux

# Create a sudoers file for this user
echo "dux ALL = (root) NOPASSWD:ALL" | sudo tee /etc/sudoers.d/dux
On controller host
The ideal is to have a SSH passwordless connection :
# Generate a SSH key (no passphrase for the example)
ssh-keygen -t ed25519 -f controller_key -N "" -q

# Have this key allowed on the controlled host
ssh-copy-id -i controller_key.pub dux@<controlled host address>
Standard
Usage
dux -t <tasklist.yaml> -l <hostlist.yaml> -k <SSH private key> -u <username>
with tasklist.yaml
- name: Let's install a web server !
  steps:
    - name: First, we test the connectivity and authentication with the host.
      ping:

    - name: Then we can install the package...
      with_sudo: true
      apt:
        package: '{{ package_name }}'
        state: present

    - name: ... and start & enable the service.
      with_sudo: true
      service:
        name: '{{ service_name }}'
        state: started
        enabled: true
and hostlist.yaml
vars:
  package_name: apache2
  service_name: apache2

hosts:
  - 10.20.0.203
  - 10.20.0.204
Output example
{
  "jobs": [
    {
      "host": "10.20.0.203",
      "timestamp_start": "2024-11-07T22:53:52.781400539+00:00",
      "timestamp_end": "2024-11-07T22:54:06.610757092+00:00",
      "final_status": "ApplySuccesful",
      "tasks": [
        {
          "name": "Let's install a web server !",
          "steps": [
            {
              "name": "First, we test the connectivity and authentication with the host.",
              "expected_state": {
                "ping": {}
              },
              "status": "ApplySuccessful"
            },
            {
              "name": "Then we can install the package...",
              "expected_state": {
                "apt": {
                  "state": "present",
                  "package": "apache2"
                }
              },
              "status": "ApplySuccessful"
            },
            {
              "name": "... and start & enable the service.",
              "expected_state": {
                "service": {
                  "name": "apache2",
                  "state": "started",
                  "enabled": true
                }
              },
              "status": "ApplySuccessful"
            }
          ]
        }
      ]
    },
    {
      "host": "10.20.0.204",
      "timestamp_start": "2024-11-07T22:53:52.742561538+00:00",
      "timestamp_end": "2024-11-07T22:54:04.799505739+00:00",
      "final_status": "ApplySuccesful",
      "tasks": [
        {
          "name": "Let's install a web server !",
          "steps": [
            {
              "name": "First, we test the connectivity and authentication with the host.",
              "expected_state": {
                "ping": {}
              },
              "status": "ApplySuccessful"
            },
            {
              "name": "Then we can install the package...",
              "expected_state": {
                "apt": {
                  "state": "present",
                  "package": "apache2"
                }
              },
              "status": "ApplySuccessful"
            },
            {
              "name": "... and start & enable the service.",
              "expected_state": {
                "service": {
                  "name": "apache2",
                  "state": "started",
                  "enabled": true
                }
              },
              "status": "ApplySuccessful"
            }
          ]
        }
      ]
    }
  ]
}
Agent
The dux agent allows a host to regularly retrieve a tasklist from somewhere else and apply it to itself.
Pros and cons
Advantages
- hosts handle themselves, no need for a centralized server which can reach every machine, be compatible with everything (execution environments), have root-level access to every machine...
- hosts don't need to have an open port and an SSH server running behind it with some root-level user able to connect. Hosts stay simple clients as they should : they open some random port, initiate some connection protocol, get the tasklist from the server then close everything.
- no need for complex key managment (have server's key authorized everywhere, or play with multiple keys...) which can drive beginners to turn to classic username/password system, using same password everywhere, or even worse...
- you can replicate your tasklist to multiple servers, one per subnet for example, and have a better control over data flows through firewall rules and such
Disadvantages
- in a way, you loose the initiative on your hosts : if you want a new tasklist to be applied immediatly, you have to configure agents to check tasklist updates very often, which can be a burden for your network if you have many hosts. A compromise has to be found between tasklist checking frequency and networking ressources.
- you don't need to install an SSH server, have keys/hosts authorized and everything, but now you need to install the dux agent and configure it on every host. So, even if it's just installing a deb/rpm package and modifying a text file somewhere, preliminary work is still required.
TODO
Create a watcher which will be listening for hosts results. This watcher can be passed to agents as an endpoint where they can send their results, allowing the user to monitor which host did what. This way, we find back our centralized architecture but we avoid having SSH servers with root-level access everywhere.
Dux scalable implementation (TO BE UPDATED)
The Assignment type derives the serde traits Serialize and Deserialize.
#![allow(unused)]
fn main() {
#[derive(Debug, Clone, Serialize, Deserialize)]
pub struct Assignment {
    ...
}
}
Then, using the serde_json crate, we can do this :
#![allow(unused)]
fn main() {
// Serialize
let serialized_assignment: String = serde_json::to_string(&assignment).unwrap();
// Send this String to another host via a TcpStream or anything else...

// A serialized Assignment is received.
// Deserialize it
let deserialized_assignment: Assignment = serde_json::from_str(serialized_assignment).unwrap();
}
It means the work can be split between multiple machines. One machine will generate an Assignment based on a TaskList and a HostList and send it to another one which will actually run it on the targeted host. The results can then be sent to a last machine which will display them as part of a web interface for instance.
As an example, in this Dux scalable version, the work is divided between controllers and workers, which a message broker in the middle. The Dux controller publishes Assignments on a RabbitMQ queue and consumes results on another queue. The Dux workers consume Assignments, run them and publish the results.
This allows to scale the operation when needed by increasing the number of workers and/or their capacity to multithread.
Architecture (TO BE UPDATED)
Security
Each message is encrypted with password-based symmetric encryption. The message broker doesn't have access to the data.
Controller (TO BE UPDATED)
The Dux Scalable Controller generates Assignments (one per targeted host), publishes them on a RabbitMQ instance, and consumes results from this same instance.
Usage
dux-scalable-controller -t <tasklist.yaml> -l <hostlist.yaml> [-u <dux> -k <ssh_private_key>]
Configuration
TBD
Output example
    ██████╗ ██╗   ██╗██╗  ██╗
    ██╔══██╗██║   ██║╚═███╔═╝
    ██║  ██║██║   ██║  ███║
    ██████╔╝╚██████╔╝██╔╝ ██╗
    ╚═════╝  ╚═════╝ ╚═╝  ╚═╝
    🅲🅾🅽🆃🆁🅾🅻🅻🅴🆁

[2024-08-04T19:42:29Z INFO  simple_crypt] Encrypting
[2024-08-04T19:42:29Z INFO  dux_controller] 2A0E791A89693389EC0BE36BC97432626107998945A8C8B772DDC00578726DE8 : assignment sent to message broker
[2024-08-04T19:42:39Z INFO  simple_crypt] Decrypting
[2024-08-04T19:42:39Z INFO  dux_controller] 2A0E791A89693389EC0BE36BC97432626107998945A8C8B772DDC00578726DE8 : assignment result received
Host 10.20.0.204 : Matched
Worker (TO BE UPDATED)
Output example
    ██████╗ ██╗   ██╗██╗  ██╗
    ██╔══██╗██║   ██║╚═███╔═╝
    ██║  ██║██║   ██║  ███║
    ██████╔╝╚██████╔╝██╔╝ ██╗
    ╚═════╝  ╚═════╝ ╚═╝  ╚═╝
    🆆🅾🆁🅺🅴🆁

[2024-08-04T19:42:37Z INFO  simple_crypt] Decrypting
[2024-08-04T19:42:37Z INFO  dux_worker] 2A0E791A89693389EC0BE36BC97432626107998945A8C8B772DDC00578726DE8 : Assignment received
[2024-08-04T19:42:38Z INFO  simple_crypt] Encrypting
[2024-08-04T19:42:38Z INFO  dux_worker] 2A0E791A89693389EC0BE36BC97432626107998945A8C8B772DDC00578726DE8 : Result sent to message broker
Distributed (TO BE UPDATED)
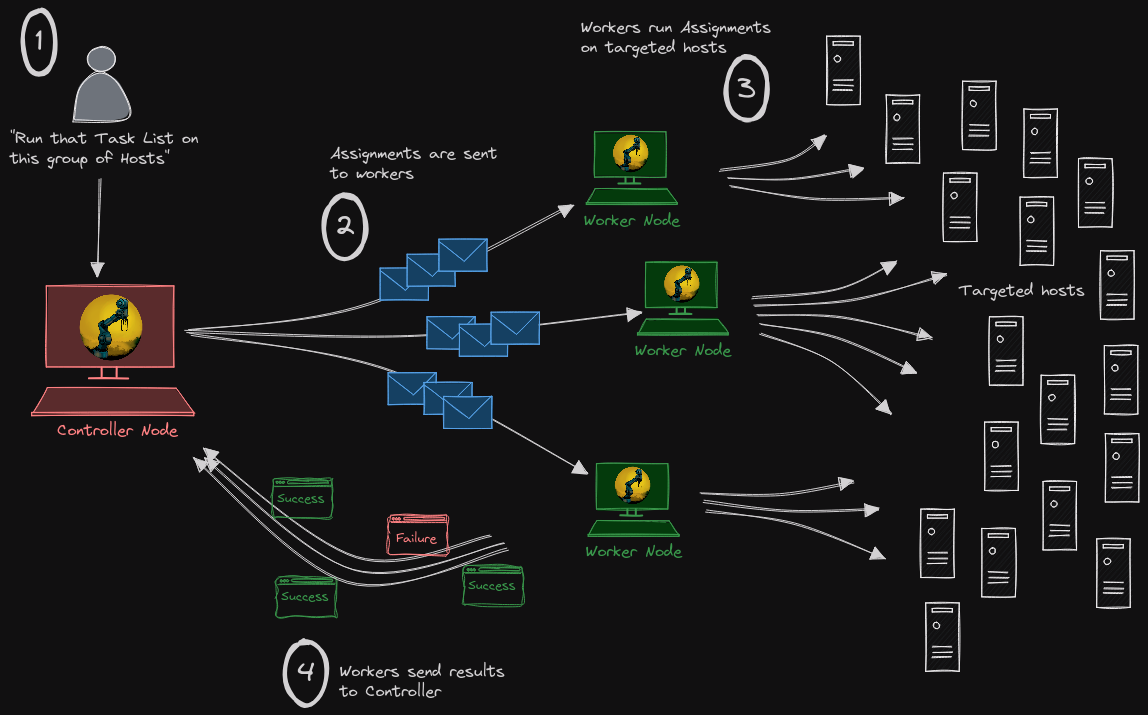
In the same spirit as the scalable implementation, in the Dux distributed version, the work is split between multiple machines. The assignments are generated by a controller and sent to workers which actually run them on targeted hosts.
The key difference is that Controller and workers directly talk to each other. They are declared from the beginning and the controller chooses which worker will handle an Assignment.
This implementation is less flexible than the scalable one but is simpler to use, as you don't need a message broker.
Architecture (TO BE UPDATED)
Security
Using Ockam, all the data moving from one host (controller/worker) to the other is encrypted.
Controller (TO BE UPDATED)
Worker (TO BE UPDATED)
What's next
Todo list
-
Global : optimization (lots of
cloneout there...) -
Global : error handling (lots of
unwrapout there...) - HostList: introduce aliases and connection mode
- HostList: add JSON format handling
- TaskExec: modules need to produce a standardized JSON result, reusable directly by later steps ('register')
- RabbitMQ: turn connections parts into a crate
- RabbitMQ: add resiliency mechanisms (lost connection...etc)
- Connection: introduce compatibility with QUIC, SSH3, other protocol ?
- modules to handle Android and IOT devices ?
- full ansible syntax compatibility ?
- log generation : what is applied when on what, syslog interaction, ability to generate JSON content (for log aggregators for example)
- Create a gRPC based example implementation
- Create a watcher to get the results from the dux agents